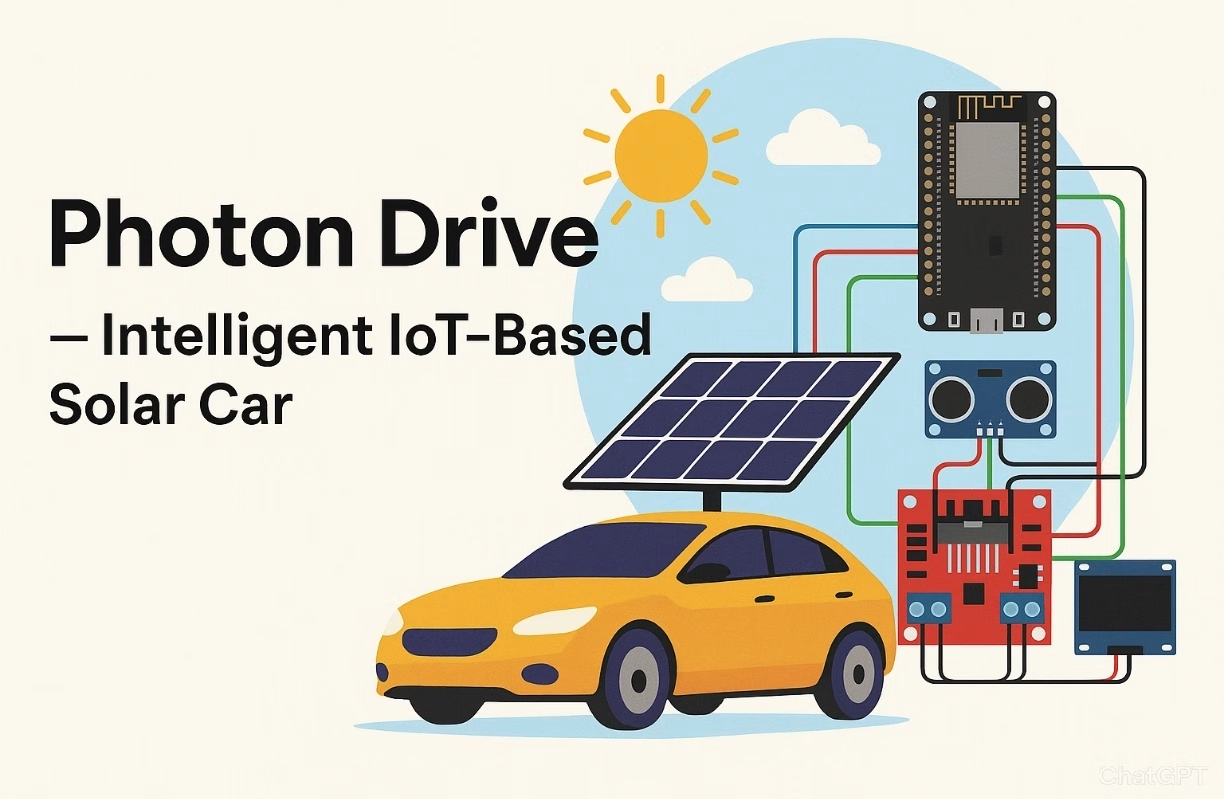
Here’s a complete project web article for “Photon Drive — Intelligent IoT-Based Solar Car”.
☀️ Intelligent IoT-Based Solar Car
Drive the Future with Solar Power, Smart Sensors & IoT Control
🚗 Project Overview
Photon Drive is a DIY solar-powered car enhanced with IoT capabilities and intelligent control systems. Designed for environmental sustainability and educational purposes, this car is not only powered by sunlight but also monitored and controlled remotely via a web dashboard or smartphone app using Blynk or MQTT.
Whether you’re an enthusiast, student, or educator, this is your gateway to smart mobility and renewable tech.
🧠 Features
- 🔋 Solar Charging System
- 🌐 Real-Time IoT Monitoring
- 📡 Remote Driving via Smartphone (Blynk)
- 🧭 Smart Navigation with Obstacle Avoidance
- 📊 Data Logging: Speed, Battery, Temperature
- 🔔 Alert System for Low Battery or Overheat
- 🌞 Eco Mode for Solar-Only Operation
⚠️ Attention !
Before starting any project implementation, please read the Safety & Legal Disclaimer section at the bottom of this page. It contains important guidelines to ensure safe and responsible usage.
🔧 Required Components
| Component | Description |
|---|---|
| ESP32 Dev Board | IoT controller |
| Solar Panel (6V-9V) | Power supply |
| L298N Motor Driver | Drive controller |
| DC Motors + Wheels | Car movement |
| Ultrasonic Sensor (HC-SR04) | Obstacle detection |
| DHT22 Sensor | Temperature monitoring |
| Li-Ion Battery + Charging Circuit | Energy storage |
| Blynk App or MQTT Broker | Remote control |
| Chassis + Castor | Mechanical body |
| OLED or LCD Display (optional) | On-car data display |
⚙️ Wiring Diagram

🧩 Arduino Code — Solar Car with IoT
#include <WiFi.h>
#include <BlynkSimpleEsp32.h>
#include <DHT.h>

#define DHTPIN 4
#define DHTTYPE DHT22
DHT dht(DHTPIN, DHTTYPE);

#define IN1 14
#define IN2 27
#define ENA 12
#define TRIG 5
#define ECHO 18

char auth[] = "YourBlynkAuthToken";
char ssid[] = "YourSSID";
char pass[] = "YourWiFiPassword";

BlynkTimer timer;

long duration;
int distance;

void setup() {
  Serial.begin(115200);
  pinMode(IN1, OUTPUT);
  pinMode(IN2, OUTPUT);
  pinMode(ENA, OUTPUT);
  pinMode(TRIG, OUTPUT);
  pinMode(ECHO, INPUT);

  dht.begin();
  Blynk.begin(auth, ssid, pass);
  timer.setInterval(2000L, sendSensorData);
}

void sendSensorData() {
  float temp = dht.readTemperature();
  float hum = dht.readHumidity();
  Blynk.virtualWrite(V5, temp);
  Blynk.virtualWrite(V6, hum);
  Serial.print("Temp: "); Serial.println(temp);
}

void loop() {
  Blynk.run();
  timer.run();
  checkObstacle();
}

void checkObstacle() {
  digitalWrite(TRIG, LOW);
  delayMicroseconds(2);
  digitalWrite(TRIG, HIGH);
  delayMicroseconds(10);
  digitalWrite(TRIG, LOW);
  duration = pulseIn(ECHO, HIGH);
  distance = duration * 0.034 / 2;

  if (distance < 20) {
    stopCar();
  }
}

BLYNK_WRITE(V1) {
  int x = param.asInt();
  if (x == 1) forward();
  else stopCar();
}

void forward() {
  digitalWrite(IN1, HIGH);
  digitalWrite(IN2, LOW);
  analogWrite(ENA, 200);
}

void stopCar() {
  digitalWrite(IN1, LOW);
  digitalWrite(IN2, LOW);
}
🌤️ Solar Charging Concept
The solar panel charges a 3.7V Li-Ion battery via a TP4056 charging module. The power is boosted (if needed) using a DC-DC converter to drive motors and the ESP32. Monitor solar voltage and battery level via an analog pin and display values on the dashboard.
int solarPin = 35; // Analog pin for solar voltage
float voltage = analogRead(solarPin) * (3.3 / 4095.0) * 2; // voltage divider

Blynk.virtualWrite(V7, voltage);
📱 Control & Monitor — Blynk Interface
- V1 – Control forward/stop
- V5 – Temperature
- V6 – Humidity
- V7 – Battery/solar voltage
- V8 – Distance to obstacle
Use buttons, gauges, and charts to monitor real-time data on your phone or tablet.
📈 Use Case Extensions
- 🌐 Replace Blynk with MQTT + Node-RED Dashboard
- 🛰️ Add GPS module for solar-car tracking
- 🎤 Add voice control using Google Assistant via IFTTT
- 🧠 Integrate with AI for route optimization
🚀 Build Instructions
- Assemble components on chassis
- Connect wiring as per Fritzing
- Upload code via Arduino IDE
- Configure Blynk dashboard or MQTT broker
- Charge under the sun and drive remotely!
- Monitor data live and log results
🎯 Educational Outcomes
- Learn solar energy systems
- Understand IoT concepts (sensors + cloud)
- Apply real-time control & monitoring
- Practice Arduino coding & wireless tech
📦 Download Full Project Package
- ✅ Arduino Code (.ino)
- ✅ Fritzing Circuit (.fzpz)
- ✅ 3D Chassis Design (.stl)
- ✅ Printable Instruction Manual (.pdf)
⚠️ Safety & Legal Disclaimer
These projects arefor educational, prototyping, andideation purposesonly.
These systems, developed usingAI logic, should becarefully testedbefore being implemented in the real world, and the accuracy of the electronic devices and connections usedshould be double-checked.
All actions, implementations, and outcomes resulting from this project are entirely the responsibility of the developer or individual applying the system.
For real-life deployment, the system must be equipped with proper sensors, protective housings, safety mechanisms, and comply with local legal regulations.
Any misuse or misinterpretation of the project that results in device damage, data loss, or accidental injury is entirely the user’s responsibility.
Always use the projectresponsiblyand perform thoroughextensive testingbefore live use or field deployment.
⚠️ Supervision & Controls
Especially for users with limited electronics experience, including children, it is strongly advised to work under the constant supervision of an experienced adult or professional when assembling or testing such projects.
💬 Have a Question or Idea?
💡 Leave a comment below and share how you would enhance Photon Drive!
“Drive Smart. Drive Solar. Drive the Future.” ☀️🚗
👉 Share your thoughts in the comments and join the discussion on ROBOFORUM – the community for future-minded thinkers in robotics and AI!
👇 Leave a comment and join the discussion. If you’re not already subscribed, please subscribe or log in