Complete Step-by-Step Guide
📢 What Is This Project?
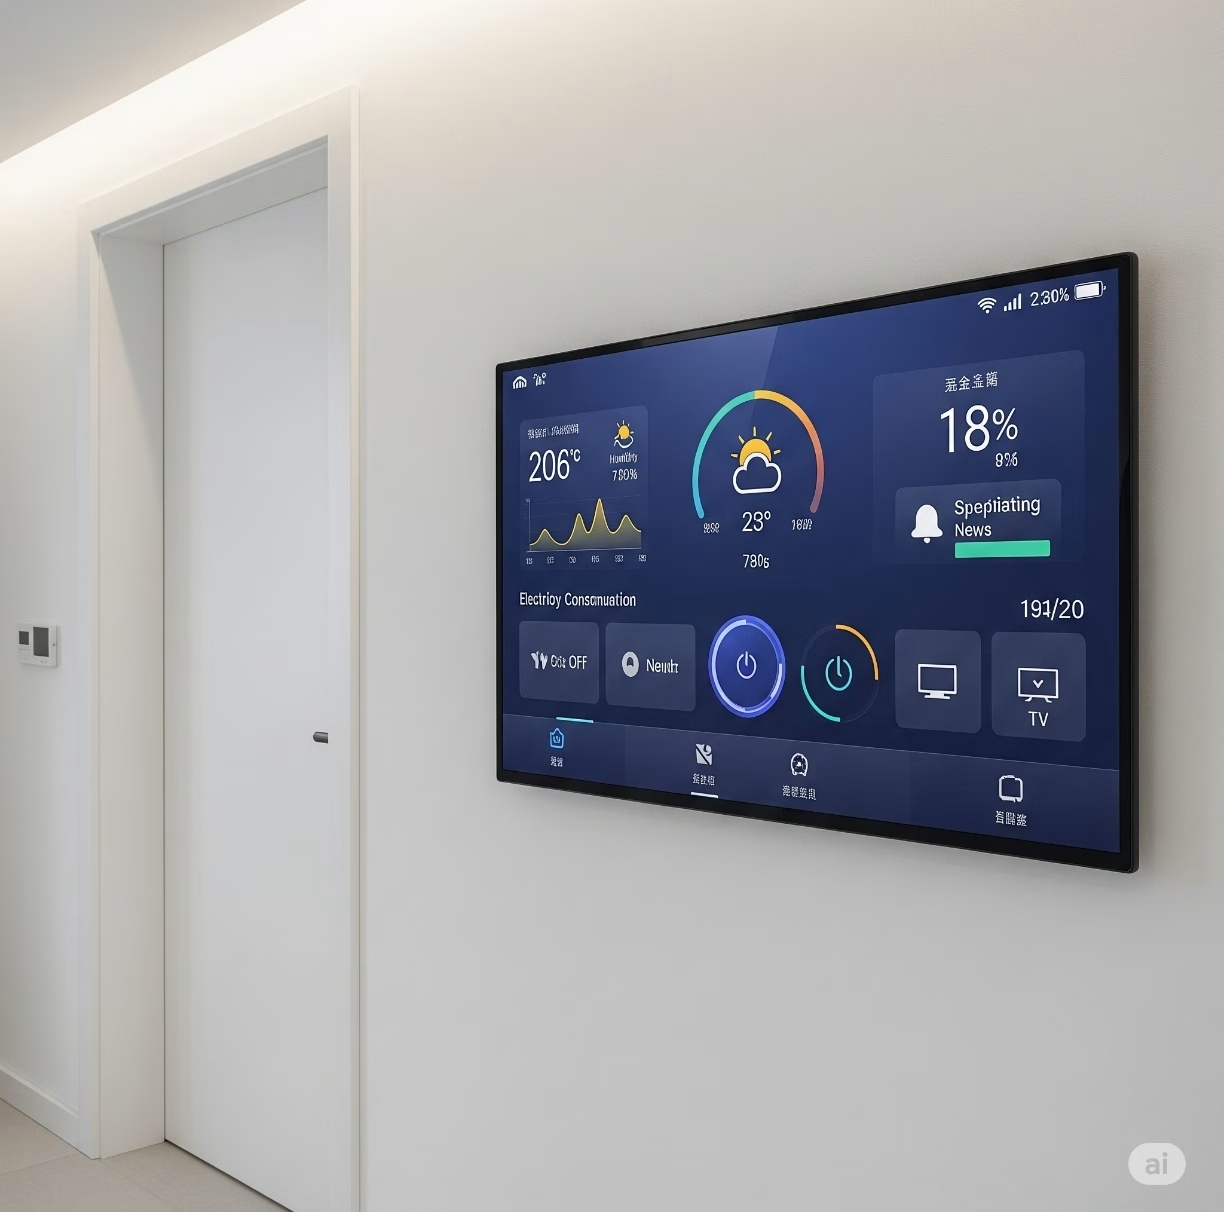
This Smart Home Information Panel is a centralized device to monitor and control your home environment and devices. Using an ESP32 microcontroller and a color LCD screen, it provides:
- Real-time indoor and outdoor environment data (temperature, humidity, weather)
- Electricity consumption monitoring
- Device control (like turning your air conditioner on/off remotely)
- Message notifications from WhatsApp, SMS, Email
- Voice alerts for important events
- Integration with Home Assistant via MQTT for smart automation
- Optional touchscreen menu for manual controls
The panel hangs on your door or wall and keeps your family informed and connected in a single glance!
⚠️ Attention !
Before starting any project implementation, please read the Safety & Legal Disclaimer section at the bottom of this page. It contains important guidelines to ensure safe and responsible usage.
🚀 Ready to Start?
Build your smart home dashboard step by step:
- Set up ESP32 WiFi & MQTT
- Connect sensors & test readings
- Configure device control & voice alerts
- Integrate with Home Assistant for automation
- Optionally add touchscreen interface & weather API
📌 Notes
Don’t forget to enter your WiFi and MQTT settings in the WIFI_SSID, WIFI_PASSWORD, and MQTT_SERVER fields.
You can configure the DFPlayer Mini RX/TX pins according to your hardware (GPIO4 and GPIO5 are used in the example).
Copy the mp3 files to a microSD card and insert them into the DFPlayer Mini.
You should configure the TFT_eSPI settings (User_Setup.h) appropriately based on your TFT display driver.
🧰 Hardware Components – What You’ll Need
| Quantity | Component | Icon | Purpose |
|---|---|---|---|
| 1 | ESP32 Dev Board | 🧠 | Main controller |
| 1 | TFT LCD Display | 🖥️ | Display info & user interface |
| 1 | DHT22 Sensor | 🌡️ | Measures indoor temperature & humidity |
| 1 | PZEM-004T v3.0 | ⚡ | Measures electricity consumption |
| 1 | Relay Module (1-ch) | 🔌 | Controls devices (e.g. AC, lights) |
| 1 | DFPlayer Mini | 🔊 | Plays voice notifications |
| 1 | MicroSD Card | 💾 | Stores audio files for DFPlayer |
| 1 | Speaker | 🔈 | Outputs voice alerts |
| Misc | Wires, resistors, connectors | 🔧 | For connections and circuit setup |
🏗️ Project Overview: How It Works
- Sensors collect data
- DHT22 reads indoor temperature & humidity
- PZEM-004T tracks voltage, current, power usage
- ESP32 processes & displays info on the TFT LCD screen with multiple sections
- ESP32 communicates via WiFi & MQTT with Home Assistant
- Home Assistant controls devices through MQTT commands, e.g. turn AC on/off via relay
- Voice notifications play via DFPlayer Mini when events happen (e.g. new message or device status change)
- Messages from family appear on the screen with alerts
- Optionally, you can control devices via touchscreen menu
🚀 Step-by-Step Module Breakdown
1️⃣ Real-Time Clock & MQTT Messaging
- Purpose: Show time and receive/display messages sent over MQTT
- Hardware: ESP32, TFT LCD
- Key Features: NTP time sync, MQTT client, message subscription
- Code Highlights:
// Setup WiFi & MQTT, subscribe to message topic
// Display time and messages on LCD
2️⃣ Indoor Environment Monitoring (DHT22)
- Purpose: Measure and show indoor temperature and humidity
- Hardware: DHT22 sensor connected to ESP32
- Code Highlights:
#include <DHT.h>
#define DHTPIN 15
#define DHTTYPE DHT22

DHT dht(DHTPIN, DHTTYPE);

void setup() {
  dht.begin();
}

void loop() {
  float temp = dht.readTemperature();
  float hum = dht.readHumidity();
  // Display on LCD & send via MQTT
}
3️⃣ Electricity Consumption Monitoring (PZEM-004T v3.0)
- Purpose: Measure home voltage, current, power, energy usage
- Hardware: PZEM-004T energy meter connected via UART to ESP32
- Safety Note: Only connect to mains power if you are qualified!
- Code Highlights:
#include <PZEM004Tv30.h>
HardwareSerial pzemSerial(2);
PZEM004Tv30 pzem(pzemSerial);

void setup() {
  pzemSerial.begin(9600, SERIAL_8N1, 16, 17);
}

void loop() {
  float voltage = pzem.voltage();
  float current = pzem.current();
  // Display & MQTT publish
}
4️⃣ Device Control via Relay (Climate System Example)
- Purpose: Turn devices like air conditioner ON/OFF remotely
- Hardware: Relay module controlled by ESP32 GPIO pin
- Code Highlights:
#define RELAY_PIN 27
pinMode(RELAY_PIN, OUTPUT);

void handleMQTT(String command) {
  if (command == "on") digitalWrite(RELAY_PIN, HIGH);
  else if (command == "off") digitalWrite(RELAY_PIN, LOW);
}
5️⃣ Voice Notifications with DFPlayer Mini
- Purpose: Play audio alerts for messages or device state changes
- Hardware: DFPlayer Mini + speaker + microSD card with mp3 files
- Audio Files:
001.mp3– Climate ON002.mp3– Climate OFF003.mp3– New message alert
- Code Highlights:
#include <DFRobotDFPlayerMini.h>
HardwareSerial mp3Serial(2);
DFRobotDFPlayerMini mp3;

void playNotification(int track) {
  mp3.play(track);
}
6️⃣ Outdoor Weather via OpenWeatherMap API (Optional)
- Purpose: Show outdoor temperature and weather icons
- Software: ESP32 HTTP requests to OpenWeatherMap API
- Code Snippet:
// Make HTTP GET to OpenWeatherMap
// Parse JSON for temperature and icon
// Display on LCD
7️⃣ Interactive Touchscreen Menu (Optional)
- Purpose: Control devices manually via LCD touchscreen
- Hardware: TFT touchscreen (e.g., ILI9341 touch panel)
- Code Snippet:
// Use TFT touch library to detect touches
// Switch relay state or navigate menus
📡 MQTT Topic Structure & Home Assistant Setup
| Topic | Description |
|---|---|
home/sensors/temp_in | Indoor temperature |
home/sensors/humidity_in | Indoor humidity |
home/sensors/voltage | Voltage measurement |
home/device/climate | Climate ON/OFF commands |
home/notifications/msg | New message notifications |
Example Home Assistant YAML for Climate Switch:
switch:
  - platform: mqtt
    name: "Climate Control"
    command_topic: "home/device/climate"
    payload_on: "on"
    payload_off: "off"
🎨 User Interface Layout Suggestion
| Section | Description |
|---|---|
| Top Bar | Real-time clock and date |
| Left Column | Indoor temperature & humidity |
| Right Column | Electricity consumption data |
| Bottom Area | Device status & incoming messages |
| Optional Overlay Menu | Touchscreen buttons for controls |
🔗 Additional Resources & Links
- ESP32 Arduino Core
- Adafruit DHT Sensor Library
- PZEM-004T Arduino Library
- DFRobot DFPlayer Mini Library
- OpenWeatherMap API
- Home Assistant MQTT Integration
Integrated codes
#include <WiFi.h> #include <PubSubClient.h> #include <DHT.h> #include <PZEM004Tv30.h> #include <DFRobotDFPlayerMini.h> #include <HardwareSerial.h> #include <TFT_eSPI.h>

#define WIFI_SSID       "YOUR_WIFI_SSID" #define WIFI_PASSWORD   "YOUR_WIFI_PASSWORD" #define MQTT_SERVER     "YOUR_MQTT_BROKER_IP" #define MQTT_PORT       1883 #define MQTT_CLIENT_ID  "ESP32_SmartPanel"

#define DHTPIN          15 #define DHTTYPE         DHT22 #define RELAY_PIN       27

#define PZEM_RX         16 #define PZEM_TX         17

TFT_eSPI tft = TFT_eSPI(); #define TFT_WIDTH       320 #define TFT_HEIGHT      240

WiFiClient espClient; PubSubClient mqttClient(espClient); DHT dht(DHTPIN, DHTTYPE);

HardwareSerial pzemSerial(2); PZEM004Tv30 pzem(pzemSerial);

HardwareSerial mp3Serial(1); DFRobotDFPlayerMini dfplayer;

float indoorTemp = 0.0; float indoorHum = 0.0; float voltage = 0.0; float current = 0.0; float power = 0.0; bool relayState = false;

unsigned long lastSensorRead = 0; const unsigned long SENSOR_INTERVAL = 10000;

void connectWiFi(); void connectMQTT(); void mqttCallback(char* topic, byte* payload, unsigned int length); void updateSensors(); void publishSensorData(); void updateDisplay(); void playSound(int track); void setRelay(bool state); void printCentered(int y, String text);

void setup() { Serial.begin(115200); pinMode(RELAY_PIN, OUTPUT); digitalWrite(RELAY_PIN, LOW); dht.begin();

tft.init(); tft.setRotation(1); tft.fillScreen(TFT_BLACK); tft.setTextColor(TFT_WHITE); tft.setTextSize(2);

pzemSerial.begin(9600, SERIAL_8N1, PZEM_RX, PZEM_TX); mp3Serial.begin(9600, SERIAL_8N1, 4, 5); if (!dfplayer.begin(mp3Serial)) { Serial.println("DFPlayer Mini not detected!"); } else { dfplayer.volume(20); }

connectWiFi(); mqttClient.setServer(MQTT_SERVER, MQTT_PORT); mqttClient.setCallback(mqttCallback); connectMQTT(); tft.fillScreen(TFT_BLACK); printCentered(10, "Smart Home Panel"); }

void loop() { if (!mqttClient.connected()) { connectMQTT(); } mqttClient.loop(); unsigned long now = millis(); if (now - lastSensorRead > SENSOR_INTERVAL) { lastSensorRead = now; updateSensors(); publishSensorData(); updateDisplay(); } }

void connectWiFi() { Serial.print("Connecting to WiFi..."); WiFi.begin(WIFI_SSID, WIFI_PASSWORD); while (WiFi.status() != WL_CONNECTED) { delay(500); Serial.print("."); } Serial.println("Connected!"); }

void connectMQTT() { while (!mqttClient.connected()) { Serial.print("Connecting to MQTT..."); if (mqttClient.connect(MQTT_CLIENT_ID)) { Serial.println("Connected!"); mqttClient.subscribe("home/device/climate"); mqttClient.subscribe("home/notifications/msg"); } else { Serial.print("Failed, rc="); Serial.print(mqttClient.state()); Serial.println(" Try again in 2 seconds"); delay(2000); } } }

void mqttCallback(char* topic, byte* payload, unsigned int length) { String msg = ""; for (unsigned int i = 0; i < length; i++) { msg += (char)payload[i]; } if (String(topic) == "home/device/climate") { if (msg == "on") { setRelay(true); playSound(1); tft.fillRect(0, 180, TFT_WIDTH, 40, TFT_BLACK); printCentered(190, "Climate ON"); } else if (msg == "off") { setRelay(false); playSound(2); tft.fillRect(0, 180, TFT_WIDTH, 40, TFT_BLACK); printCentered(190, "Climate OFF"); } } if (String(topic) == "home/notifications/msg") { playSound(3); tft.fillRect(0, 220, TFT_WIDTH, 20, TFT_BLACK); tft.setCursor(0, 220); tft.setTextSize(1); tft.print("Message: " + msg); } }

void updateSensors() { indoorTemp = dht.readTemperature(); indoorHum = dht.readHumidity(); voltage = pzem.voltage(); current = pzem.current(); power = pzem.power(); if (isnan(indoorTemp) || isnan(indoorHum)) { indoorTemp = 0; indoorHum = 0; } }

void publishSensorData() { char buf[16]; snprintf(buf, sizeof(buf), "%.2f", indoorTemp); mqttClient.publish("home/sensors/temp_in", buf); snprintf(buf, sizeof(buf), "%.2f", indoorHum); mqttClient.publish("home/sensors/humidity_in", buf); snprintf(buf, sizeof(buf), "%.2f", voltage); mqttClient.publish("home/sensors/voltage", buf); snprintf(buf, sizeof(buf), "%.2f", current); mqttClient.publish("home/sensors/current", buf); snprintf(buf, sizeof(buf), "%.2f", power); mqttClient.publish("home/sensors/power", buf); }

void updateDisplay() { tft.fillRect(0, 0, TFT_WIDTH, 30, TFT_BLACK); tft.setTextSize(2); tft.setCursor(0, 0); tft.printf("Temp: %.1f C  Hum: %.1f %%", indoorTemp, indoorHum); tft.fillRect(0, 35, TFT_WIDTH, 30, TFT_BLACK); tft.setCursor(0, 35); tft.printf("Volt: %.1f V  Curr: %.2f A", voltage, current); tft.fillRect(0, 70, TFT_WIDTH, 30, TFT_BLACK); tft.setCursor(0, 70); tft.printf("Power: %.1f W", power); tft.fillRect(0, 150, TFT_WIDTH, 30, TFT_BLACK); tft.setCursor(0, 150); tft.printf("Climate: %s", relayState ? "ON" : "OFF"); }

void playSound(int track) { if (dfplayer.available()) { dfplayer.play(track); } }

void setRelay(bool state) { relayState = state; digitalWrite(RELAY_PIN, relayState ? HIGH : LOW); }

void printCentered(int y, String text) { int16_t x1, y1; uint16_t w, h; tft.setTextSize(2); tft.getTextBounds(text, 0, y, &x1, &y1, &w, &h); int16_t x = (TFT_WIDTH - w) / 2; tft.setCursor(x, y); tft.print(text); }
This code is a basic, fully integrated example. You can add modules such as the touch menu, OpenWeatherMap API, and WhatsApp message integration as desired.


💬 Have you tried 🌟 Smart Home Information Panel Using ESP32?
👇 Leave a comment and join the discussion. If you’re not already subscribed, please subscribe or log in
⚠️ Safety & Legal Disclaimer
This project is for educational and prototyping purposes only.
- AI logic should be carefully tested before being automatically implemented.
- All operations and applications performed in these projects are the responsibility of the project developer.
- For real-world applications, the system must be equipped with sensors, protective enclosures, and comply with legal regulations.
- Any resulting damage, misuse, or misinterpretation of data, devices, or others is the sole responsibility of the user.
Please use the project responsibly and conduct thorough testing before field implementation.
Supervision and Control
It is strongly recommended that children, especially those with limited electronic knowledge, work under the constant supervision and control of an adult or experienced professional when engaging with such projects.


")