Building a remote control car using Arduino can be a fun and educational project. In this example, I’ll outline the basic steps and provide sample code to get you started. Please note that this is a simplified introduction to the concept, and you can expand and customize it to fit your specific requirements.
Components You’ll Need:
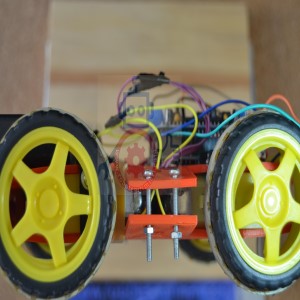
- Arduino board (e.g., Arduino Uno)
- Motor driver module (e.g., L298N)
- DC motors (2 or 4, depending on the design)
- Wheels and chassis for the car
- Remote control transmitter and receiver (e.g., RF modules)
- Battery pack or power source
- Jumper wires
Step 1: Assemble the Hardware:
- Connect the DC motors to the motor driver module. Typically, you’ll have two motors—one for each wheel. Follow the wiring instructions for your specific motor driver.
- Connect the motor driver module to the Arduino. This usually involves connecting input pins for controlling motor direction and speed to specific Arduino pins.
- Attach the wheels and chassis to your car, ensuring the motors can drive the wheels.
- Connect the RF transmitter module to the Arduino that will act as the remote control.
- Power the car and the remote control Arduino with the appropriate power sources.
Step 2: Write the Arduino Code:
Here’s a basic example code for your remote control car project. This code allows you to control the car’s movement (forward, backward, left, right) using buttons on the remote control transmitter:
// Include libraries for the remote control module (e.g., VirtualWire).
#include <VirtualWire.h>
// Define motor control pins.
int motor1Pin1 = 2; // Motor 1: Input pin 1
int motor1Pin2 = 3; // Motor 1: Input pin 2
int motor2Pin1 = 4; // Motor 2: Input pin 1
int motor2Pin2 = 5; // Motor 2: Input pin 2
void setup() {
// Initialize motor control pins as outputs.
pinMode(motor1Pin1, OUTPUT);
pinMode(motor1Pin2, OUTPUT);
pinMode(motor2Pin1, OUTPUT);
pinMode(motor2Pin2, OUTPUT);
// Initialize the remote control receiver.
vw_setup(2000); // Bits per sec
vw_rx_start(); // Start the receiver
}
void loop() {
// Buffer to hold received data.
uint8_t buf[VW_MAX_MESSAGE_LEN];
uint8_t buflen = VW_MAX_MESSAGE_LEN;
if (vw_get_message(buf, &buflen)) {
// Check the received button and control the motors accordingly.
char buttonPressed = (char)buf[0];
switch (buttonPressed) {
case ‘F’: // Forward
moveForward();
break;
case ‘B’: // Backward
moveBackward();
break;
case ‘L’: // Left
turnLeft();
break;
case ‘R’: // Right
turnRight();
break;
case ‘S’: // Stop
stopMotors();
break;
}
}
}
// Define motor control functions.
void moveForward() {
digitalWrite(motor1Pin1, HIGH);
digitalWrite(motor1Pin2, LOW);
digitalWrite(motor2Pin1, HIGH);
digitalWrite(motor2Pin2, LOW);
}
void moveBackward() {
digitalWrite(motor1Pin1, LOW);
digitalWrite(motor1Pin2, HIGH);
digitalWrite(motor2Pin1, LOW);
digitalWrite(motor2Pin2, HIGH);
}
void turnLeft() {
digitalWrite(motor1Pin1, LOW);
digitalWrite(motor1Pin2, HIGH);
digitalWrite(motor2Pin1, HIGH);
digitalWrite(motor2Pin2, LOW);
}
void turnRight() {
digitalWrite(motor1Pin1, HIGH);
digitalWrite(motor1Pin2, LOW);
digitalWrite(motor2Pin1, LOW);
digitalWrite(motor2Pin2, HIGH);
}
void stopMotors() {
digitalWrite(motor1Pin1, LOW);
digitalWrite(motor1Pin2, LOW);
digitalWrite(motor2Pin1, LOW);
digitalWrite(motor2Pin2, LOW);
}
Step 3: Upload and Test:
- Upload the code to the Arduino boards (both the car and the remote control).
- Power on the car and the remote control.
- Use the buttons on the remote control to send commands (e.g., ‘F’ for forward, ‘B’ for backward).
- Observe the car’s movement in response to your commands.
This basic example demonstrates how to control the car’s movement remotely using Arduino and an RF transmitter/receiver pair. You can expand this project by adding more features like obstacle avoidance sensors, Bluetooth or Wi-Fi control, and even incorporating sensors for autonomous navigation